

Crafting Henna Designs: A Step-by-Step Guide
The intricate beauty of henna—those delicate lines and curves transforming skin into art—can feel complex. But with a little practice, creating your own stunning designs is totally achievable. This tutorial breaks down the process, so you can start crafting beautiful patterns.
A Look at Henna's History and Meaning
Before we dive into drawing techniques, let’s appreciate the rich history of henna. It originated in ancient Egypt and spread across cultures—India, Africa, the Middle East—where it became deeply connected to celebrations, blessings, and beauty rituals. The designs themselves often carry symbolic meaning; for example, floral motifs represent growth and fertility, while geometric patterns are associated with protection.
Gather Your Supplies
To get started, you’ll need a few key items. Here's what I recommend:
- Henna Paste: Choose a natural, high-quality henna paste specifically formulated for body art. Avoid "black henna," which can contain harmful chemicals—it’s just not worth the risk.
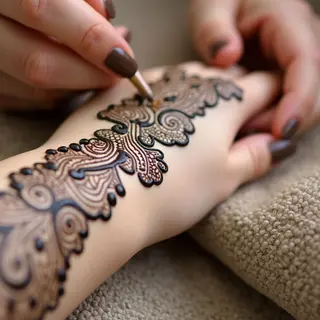
- Application Cone or Bottle: A traditional cone offers great control, but a bottle with a fine tip is often easier for beginners to manage.
- Paper Towels: Essential for cleanup and blotting excess paste.
- Design Inspiration (Optional): Having reference images or sketches can be really helpful as you’re learning.
Step-by-Step Instructions
Ready to get started? Follow these steps to create your own henna designs.
- Prepare Your Skin: Gently exfoliate the area you’ll be decorating, then apply a natural oil like coconut or olive oil. This helps the henna adhere better and creates a richer stain.
- Start with Basic Shapes: Begin by outlining simple shapes—circles, teardrops, diamonds—these form the foundation for more complex designs.
- Create Floral Elements: Draw curved lines to create petals and leaves radiating from your base shapes. Varying sizes and angles will give a more natural look.
- Add Swirls & Vines: Connect those floral elements with swirling lines, mimicking vines or tendrils. Don't be afraid to experiment—there are no hard rules!
- Incorporate Geometric Patterns: Integrate geometric designs like triangles or squares within your floral framework for added visual interest.
- Fill in Details (Optional): Once you’re comfortable with the basic structure, fill in areas with dots or short lines to create shading and dimension—it's a nice touch!
- Let it Dry & Reveal: Allow the henna paste to dry completely (usually 2-4 hours). Then, gently scrape off the dried paste to reveal the stunning design underneath. The color will deepen over time—it’s pretty magical!